Tuesday, February 5, 2013

lettuce fresher than ever


Lettuce is kind of a big deal in my kitchen. I have formed many memories around specific salads. There was the time when I moved to Dublin in my early twenties and realized that “salad” in Ireland was a slice of tomato next to some wilted lettuce as an adjunct to the chips that came with every meal. Purchasing a big salad bowl and some fixings was our first mission after finding a place to live, and my best friend and I rejoiced while chomping down on our first salad in weeks. When I learned that real French dressing was not bright orange gloop in a bottle I was 14 years old and living with a host family in France.  My host mother showed me how to make a vinaigrette with a tiny whisk. So continental!

The wilt factor is what turns some people off of salad eating. As much as I love salads, I know quite a few people who refuse to eat it, but will eat other raw veggies. That’s why it’s important to revive your lettuce and keep it fresher longer.

An informal poll (i.e. me, my mom, my dad) revealed the following tricks to keep your greens looking lovely in the fridge.

Salad spinner method

My salad eating increased hardcore once I learned I could prepare and keep lettuce so quickly and easily in a salad spinner. When my Lufa lettuce comes home to me, I tear the leaves off and leave them whole inside the spinner. Then I rinse and spin, dump the water out and stick the whole contraption in the fridge. Done!

If you don’t want to buy a salad spinner, you can use an old pillowcase and throw your carefully rinsed leaves into it. Use the centrifugal force of your arm and swing that bag of lettuce like you’re about to lasso a calf at the rodeo. This may work better if you stand in the bath, or go outside in the summer!

Plastic bag/cloth method

Give your leaves a little bath in 1-2 inches of cold water in a clean sink, or rinse them in a colander. Pat them dry with a tea towel and then place in an open bag. You can use a big zipper locked bag, or reuse a plastic grocery bag. The trick is to place the tea towel or a paper towel in with the lettuce in the plastic bag to absorb moisture. Moisture and condensation are your enemies when it comes to preserving the longevity of your lettuce.

Water jug method

Since Lufa greens usually come with their root balls attached, and were picked the day you received them (can we say fresh-tastic?) they are still alive and positively pulsing with vitamins and minerals. Keep your greens alive by placing the root balls in water, just as you would with a bouquet of flowers. Fill an old container with about 3 inches of water at the bottom, and stick your greens in the jar. This method works well if you don’t plan on eating your veg that day, and need a way to prolong their freshness until you wash and prepare your greens using one of the above methods.

Happy salad eating!


Tuesday, January 29, 2013

Glorious Garlic


This week Lufa farms gave us the gift of garlic. Garlic keeps well in the fridge, but why not make the most of its germ killing properties in one delicious dose? I decided to treat myself to some fine tasting roasted garlic and let that inspire me. From there, I made some amazing roasted garlic and rep pepper soup, and a hybrid guacamole dip. Enjoy!

Roasted Garlic and Red Pepper Soup

Ingredients:
2 bulbs roasted garlic
4 roasted red peppers
4-5 shallots or a small onion
1 medium tomato
3 tbs. olive oil
6 cups vegetable stock
1 tsp. dried basil
1 tsp. dried oregano
½ tsp. chili flakes
salt and pepper to taste.

Start by roasting your garlic and peppers.


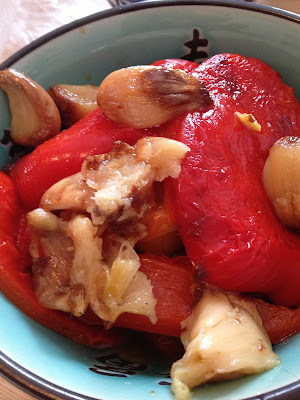
Slice the tops off the garlic and seed the peppers and cut them in half. Drizzle the garlic with olive oil. You can be generous with the oil because you can throw it into the soup later or keep it in the fridge for up to a week. Lay the peppers skin side up and place into 450 degree oven until garlic turns brown (30 minutes).


Your peppers will need about 10 minutes more for their skin to char. Let the veggies cool until you can peel the skin off of the peppers and squeeze the roasted cloves out of their papery shells.

Start frying the onion and tomato in olive oil until fragrant and soft. Add the rest of the ingredients and let simmer for about 20 minutes. Liquify the soup in the blender or food processor and return to pot to simmer for 10 minutes more.


This soup tasted great enriched with a drizzle of cream!


I had some extra parsley and cream cheese hanging around in the fridge so I decided to experiment, so I made some hybrid guac. This dip had a great contrast of deep rich flavor from the roasted garlic and lots of zing from the parsley.

Ingredients:
2 bulbs roasted garlic
2 ripe avocados
2 tbs. cream cheese
4 tbs. chopped parsley
juice of half a lemon
salt and pepper to taste

Bung everything in a food processor or mash with a fork. Done. I ate mine with celery and crackers, yummy!


Sunday, January 6, 2013

Green Tomatoes


I got a load of green tomatoes in my Lufa Farms basket this week. I've begun blogging for them, inspiring the masses to eat more veg and help them figure out what to do with those darn unfamiliar vegetables. Why, with Lufa, I've finagled some tasty meals with new (to me) veggies like tomatillos, fresh edamame, and kohlrabi, to name a few. 

So, my newest challenge: green tomatoes. What to do with them? Don’t fret, here are some simple and delicious ideas to help you get started. P.S. these dishes would a taste amazing with regular red tomatoes as well! What's more is that all these dishes are low carb for all you crazy (like me) new years resolutioners!


Stuffed Green Tomatoes with Tuna and Cheese

I made a simple tuna salad with chopped celery, yellow peppers and some mayo, but you can use whatever you have on hand or even stuff the tomato with chicken salad.


Begin by slicing the top of a medium to large tomato and hollow out the middle. I used a grapefruit knife for this task.


This already looks good enough to eat, doesn’t it? Top your stuffed tomato with grated cheese and bake in a 400 degree oven for about 20 minutes. To brown the cheese, broil for 5 minutes or until the cheese is delectably bubbling.


 Stuffed Green Tomato with Ham and Egg

If tuna’s not your bag, how about an egg based tomato dish?


 Start by coring your tomatoes and then line them with 2-3 small slices of prosciutto or ham.


Top with some grated cheese and bake in a 400 degree oven for 20 minutes, then broil for 5 minutes to melt all that cheesy goodness.


You can garnish both of these delicious dishes with a quick green tomato salsa.

Ingredients:

4 medium tomatoes (I used the cores and the tops of the ones I stuffed)
2 inches worth of seeded cucumber
½ a pepper (I used yellow pepper)
1 clove garlic
¼ medium onion
1 teaspoon ground cumin
½ teaspoon chili flakes


Blitz in a food processor or blender, or chop finely. You will notice that this salsa is very liquidy, so you may want to squeeze out some of the wetness with some cheesecloth or paper towels.


It tasted great as an accompaniment to both stuffed tomato recipes and I can’t wait to try it with some corn chips!


Tuesday, October 9, 2012

tofu green bean szechuan stir fry

Bonjour les amis! We've really been enjoying our bountiful veggie baskets from Lufa Farms, one of the world's only commercial rooftop farms. They amplify the bounty with fresh and local produce from local farms as well. The baskets have provided a variety of veggies and as a result I have been inventing new recipes and pimping old ones (tomatillos in my bean chili--booyeah!) Moreover, I collect my box at the local Green Peace office, and the people there are so friendly! I often end up chatting with other neighbourhood folk collecting their veggies. It's nice to feel part of a community of good eaters.

Here's a yummy stirfry that I think really captures some nice Chinese flavours like sesame oil, spicy szechuan pepper, and the delicious salty kick of soya. It helped me use up the tomatoes, onions, soya beans and green beans that were in my basket.


The flavour culprits that comprise most Chinese cookery: sweet, sour, salty, and umami.
Mix 2 teaspoons of sweetener (agave, honey, sugar, etc), 1 teaspoon rice vinegar, 2 tablespoons of soy sauce, and 1 teaspoon of toasted sesame oil together, then taste. Does it taste like the makings of delicious stirfry? If so, you're good to go! If not, keep tweaking it, you'll get there. 


Once your taste buds are happy, mix 1 tablespoon of cornstarch in about a 1/4 cup of water.Mix those two together, then incorporate into the stirfry sauce, like so.


Now to get your spicy szechuan salt ready. If you don't have szechuan peppers, just add regular pepper or chili flakes, whatever you fancy to get your hot on.


It was my first time cooking with szechuan peppers, which actually aren't from the pepper family at all. They're some sort of flower pod. Neat! I toasted them over a medium hot flame and waited for them to change colour, stirring often.


I decided to turn my pepper into a pepper salt by crushing about 3 teaspoons of peppers and added that to 3 tablespoons fine sea salt. Now it's stirfry time!


The regulars in my wok: garlic and ginger, about 2 tablespoons each.


A pound of tofu, chopped up and sprinkled with salt and pepper.


A sliced onion and some chopped tomatoes will add some body to the stirfry (and use up some excess from the veggie basket!)


I shelled about a cup of fresh, organic soya beans and trimmed three big handfuls of green beans while watching bad internet TV (What Not to Wear--looking hot is all about showing your waist shape, apparently) while imagining that I was a farm girl in some parched and dusty town in the deep south, fixin' my vegetables on the front porch while mama was out back poundin' the grits.


Now for the actual stir fry process: are you hungry yet? First, fry the tofu in a bit of oil over medium high heat to cook t the cubes to a golden brown crisp.


I then added the soya beans and the green beans to the wok, giving a good stir occasionally. These greens were deceptively dense, took about 10 minutes to soften.


Next, the tomatoes, garlic, ginger, and onion went in. I wanted these flavours to stand out, so I added them last and cooked for about 5 minutes.


Remember the sauce you made earlier? Add that in now and give it a good stir. Sprinkle about a teaspoon of the szechuan salt mix and let that cornstarch in the sauce do its thing. Get everything nice and coated now!


You can eat this on rice or noodles, but I just had it on its own with some sesame seeds as a garnish. Oh, I probably added tons of sriracha as well.  The peppers made the stir fry taste quite zingy, without the burn of regular chili peppers, for example. I enjoyed the electric feeling on the tongue created by the szechuan peppers.


Monday, October 1, 2012

strawberry jam (sauce)

Howdy readeroonies! My friend Rosemary and I slaved away a few weeks ago to make some strawberry jam which actually was only sauce in the end, but no matter, still delicious and blog worthy! I will show you what I did, and where we went wrong, and what you should do if you want jam and not sauce.


First, git yerself some strawbs up in the hizzle. We used double of what you see here. Roughly one pint of berries will make you 500ml of jam/sauce.


Wash and cut. Chit and chat.


Simmer berries over medium heat and add your sweetener. We made 3 batches:

-lime strawberry with maple syrup
-vanilla lemon with maple syrup and port
-classic strawberry with cinnamon and ginger


The juice of 4 limes is about sufficient for 8 cups of berries. Don't be shy to do multiple tastings. It's part of fun, and hot berry sauce is just about the funnest thing to taste and tweak. Sugar rush!


Boil away, my darlings! Alright people, at this point, when your fruit is nice and mushy and lots of liquid has exuded from the berries, you need to add thickener: pectin, kudzu, agar...something to make it gel. This, we did not do. Well, our piddly tablespoon of agar flakes did not cut it. Surf around the internet for proportions and recipes to suit your needs. 


Still, it was rewarding to see the delicious fruit mush go into sterilized jars and get sealed up in a nice bath of boiling hot water.


Next time, I will use pectin to make regular jam, and agar to make freezer sauce. Honestly, you can go through eating the stuff so quickly that boiling jars to seal them is not worth the time. Freezer jam is the way to go if you hoover through it like I do.


Cute labels! The vanilla strawberry jam tasted incredible on french toast this weekend.